Keptn v1 reached EOL December 22, 2023. For more information see https://bit.ly/keptn
This documentation is for an older Keptn release. Please consider the newest one when working with the latest Keptn.
Home / Keptn v1 Docs / Release 0.13.x / Operate Keptn / Install CLI and Keptn
Install CLI and Keptn
This page gives full instructions for installing Keptn in various scenarios.
💡 For instructions about creating a lightweight Keptn installation for studying,demonstrations, or for Keptn development work, see Quick Start.
The installation process involves the following steps:
- Check and install prerequisites
- Create or bring a Kubernetes cluster
- Install Keptn CLI
- Install Keptn, choosing the method you will use to expose and access Keptn
- Authenticate Keptn CLI against the cluster
- Authenticate the Keptn Bridge (Web UI)
Prerequisites
- Check Kubernetes support & Cluster size for information about Keptn requirements.
- Install kubectl.
Create or bring a Kubernetes cluster
To create a Kubernetes cluster, select one of the following options:
- Install local tools
-
Make sure you are logged in to your Azure account with
az login -
Create AKS cluster
- Master version:
1.20.x(tested version:v1.20.7) - One D8s_v3 node
- Install local tools
- AWS CLI (version >= 1.16.156)
- Create EKS cluster on AWS
-
Master version:
1.17(tested version:1.17) -
One
m5.2xlargenode -
Sample script using eksctl to create such a cluster
eksctl create cluster --version=1.17 --name=keptn-cluster --node-type=m5.2xlarge --nodes=1 --region=eu-west-3Please note that for EKS version
1.13in our testing we learned that the default CoreDNS that comes with certain EKS versions has a bug. To solve that issue we can use eksctl to update the CoreDNS service like this:eksctl utils update-coredns --name=keptn-cluster --region=eu-west-3 --approve
Run your Keptn installation for free on GKE! If you sign up for a Google Cloud account, Google gives you an initial $300 credit. For deploying Keptn you can apply for an additional $200 credit, which you can use towards that GKE cluster needed to run Keptn. Apply for your credit here
- Install local tools
- Create GKE cluster
-
Master version:
1.17.xand1.18.x(tested version:1.18.12) -
One node with 8 vCPUs and 32 GB memory (e.g., one n1-standard-8 node)
-
Image type
UbuntuorCOS(Note: If you plan to use Dynatrace monitoring, selectubuntufor a more convenient setup./) -
Sample script to create such a cluster:
// set environment variables
PROJECT=<NAME_OF_CLOUD_PROJECT>
CLUSTER_NAME=<NAME_OF_CLUSTER>
ZONE=us-central1-a
REGION=us-central1
GKE_VERSION="1.18"
IMAGE_TYPE="Ubuntu"
gcloud container clusters create $CLUSTER_NAME --project $PROJECT --zone $ZONE --no-enable-basic-auth --cluster-version $GKE_VERSION --machine-type "n1-standard-8" --image-type "$IMAGE_TYPE" --disk-type "pd-standard" --disk-size "100" --metadata disable-legacy-endpoints=true --scopes "https://www.googleapis.com/auth/devstorage.read_only","https://www.googleapis.com/auth/logging.write","https://www.googleapis.com/auth/monitoring","https://www.googleapis.com/auth/servicecontrol","https://www.googleapis.com/auth/service.management.readonly","https://www.googleapis.com/auth/trace.append" --num-nodes "1" --enable-stackdriver-kubernetes --no-enable-ip-alias --network "projects/$PROJECT/global/networks/default" --subnetwork "projects/$PROJECT/regions/$REGION/subnetworks/default" --addons HorizontalPodAutoscaling,HttpLoadBalancing --enable-shielded-nodes --no-enable-autoupgrade
OpenShift 4
-
Please bring your own OpenShift cluster in version 4 (tested version:
4.5) -
Install local tools
- Currently, there is the known limitation that the MongoDB of Keptn does not start. Please follow the troubleshooting guide provided here: MongoDB on OpenShift 4 fails.
OpenShift 3.11
-
Please bring your own OpenShift cluster in version 3.11
-
Install local tools
-
On the OpenShift master node, execute the following steps:
-
Set up the required permissions for your user:
oc adm policy –as system:admin add-cluster-role-to-user cluster-admin <OPENSHIFT_USER_NAME>
- Set up the required permissions for the installer pod: ```console oc adm policy add-cluster-role-to-user cluster-admin system:serviceaccount:default:default oc adm policy add-cluster-role-to-user cluster-admin system:serviceaccount:kube-system:default-
Enable admission WebHooks on your OpenShift master node:
sudo -i cp -n /etc/origin/master/master-config.yaml /etc/origin/master/master-config.yaml.backup oc ex config patch /etc/origin/master/master-config.yaml –type=merge -p ‘{ “admissionConfig”: { “pluginConfig”: { “ValidatingAdmissionWebhook”: { “configuration”: { “apiVersion”: “apiserver.config.k8s.io/v1alpha1”, “kind”: “WebhookAdmission”, “kubeConfigFile”: “/dev/null” } }, “MutatingAdmissionWebhook”: { “configuration”: { “apiVersion”: “apiserver.config.k8s.io/v1alpha1”, “kind”: “WebhookAdmission”, “kubeConfigFile”: “/dev/null” } } } } }’ >/etc/origin/master/master-config.yaml.patched if [ $? == 0 ]; then mv -f /etc/origin/master/master-config.yaml.patched /etc/origin/master/master-config.yaml /usr/local/bin/master-restart api && /usr/local/bin/master-restart controllers else exit fi
-
Please refer to the official homepage of K3s for detailed installation instructions. Here, a short guide on how to run Keptn on K3s is provided for a Linux environment. Note: If you are using macOS, you will need to run K3s using multipass and as explained here.
-
Download, install K3s (tested with versions 1.17 to 1.21) and run K3s using the following command:
curl -sfL https://get.k3s.io | INSTALL_K3S_VERSION=v1.20.4+k3s1 K3S_KUBECONFIG_MODE="644" sh -s - --no-deploy=traefikThis installs version
v1.20.4+k3s1(please refer to the K3s GitHub releases page for newer releases), sets file permissions644on/etc/rancher/k3s/k3s.yamland disablestraefikas an ingress controller. -
Export the Kubernetes profile using
export KUBECONFIG=/etc/rancher/k3s/k3s.yaml -
Verify that the connection to the cluster works
kubectl get nodes
Please refer to the official homepage of K3d for detailed installation instructions. Here, a short guide on how to run Keptn on K3d is provided for a Linux environment.
Note: Docker is required to use k3d. k3d v5.x.x requires at least Docker v20.10.5 (runc >= v1.0.0-rc93) to work properly.
You must install kubectl before installing K3d. This is used to interact with the Kubernetes cluster.
-
Download, install K3d (tested with v5.3.0) and run K3d using the following command:
curl -s https://raw.githubusercontent.com/rancher/k3d/main/install.sh | TAG=v5.3.0 bashThis installs version
v5.3.0(please refer to the K3d GitHub releases page for newer releases). -
Create a cluster called My keptn which has port fowarding and disables the traffic, which is a ingress gateaway.
k3d cluster create mykeptn -p "8082:80@loadbalancer" --k3s-arg "--no-deploy=traefik@server:*" -
Verify that the connection to the cluster works
kubectl get nodes
-
Download and install Minikube (tested with versions 1.3 to 1.10).
-
Create a new Minikube profile (named keptn) with at least 6 CPU cores and 14 GB memory using:
minikube start -p keptn --cpus 6 --memory 14000 -
(Optional) Start the Minikube LoadBalancer service in a second terminal by executing:
minikube tunnel
Keptn should run on any other Kubernetes distribution as it only consists of Kubernetes deployments, services, RBAC rules, and PVCs. However, if you are facing problems, please let us know on https://slack.keptn.sh.
Install Keptn CLI
Every Keptn release provides binaries for the Keptn CLI. You must install these separately so you can use the commands to install Keptn itself. These binaries are available for Linux, macOS, and Windows.
-
Download the version for your operating system from: GitHub
-
Unpack the archive
-
Make the
keptnbinary executable; it is located in the unpacked directory-
Linux / macOS: Add executable permissions (
chmod +x keptn), and move it to the desired destination (e.g.mv keptn /usr/local/bin/keptn) -
Windows: Copy the executable to the desired folder and add the executable to your PATH environment variable.
-
-
Now, verify that the installation has worked and that the version is correct by running:
- Linux / macOS
keptn version- Windows
.\keptn.exe version
Note: For the rest of the documentation we will stick to the Linux / macOS version of the commands.
Install Keptn
Keptn consists of a Control Plane and an Execution Plane:
-
The Control Plane allows using Keptn for the Quality Gates and Automated Operations use cases. To install the control plane containing the components for quality gates and automated operations, execute:
keptn install -
The Control Plane with the Execution Plane (for Continuous Delivery) allows to implement Continuous Delivery on top of quality gates and automated operations use cases. Please not that for this use-case Istio is required as well, as this is used for traffic routing between blue/green versions during deployment. To install the control plane with the execution plane for continuous delivery, execute:
keptn install --use-case=continuous-delivery
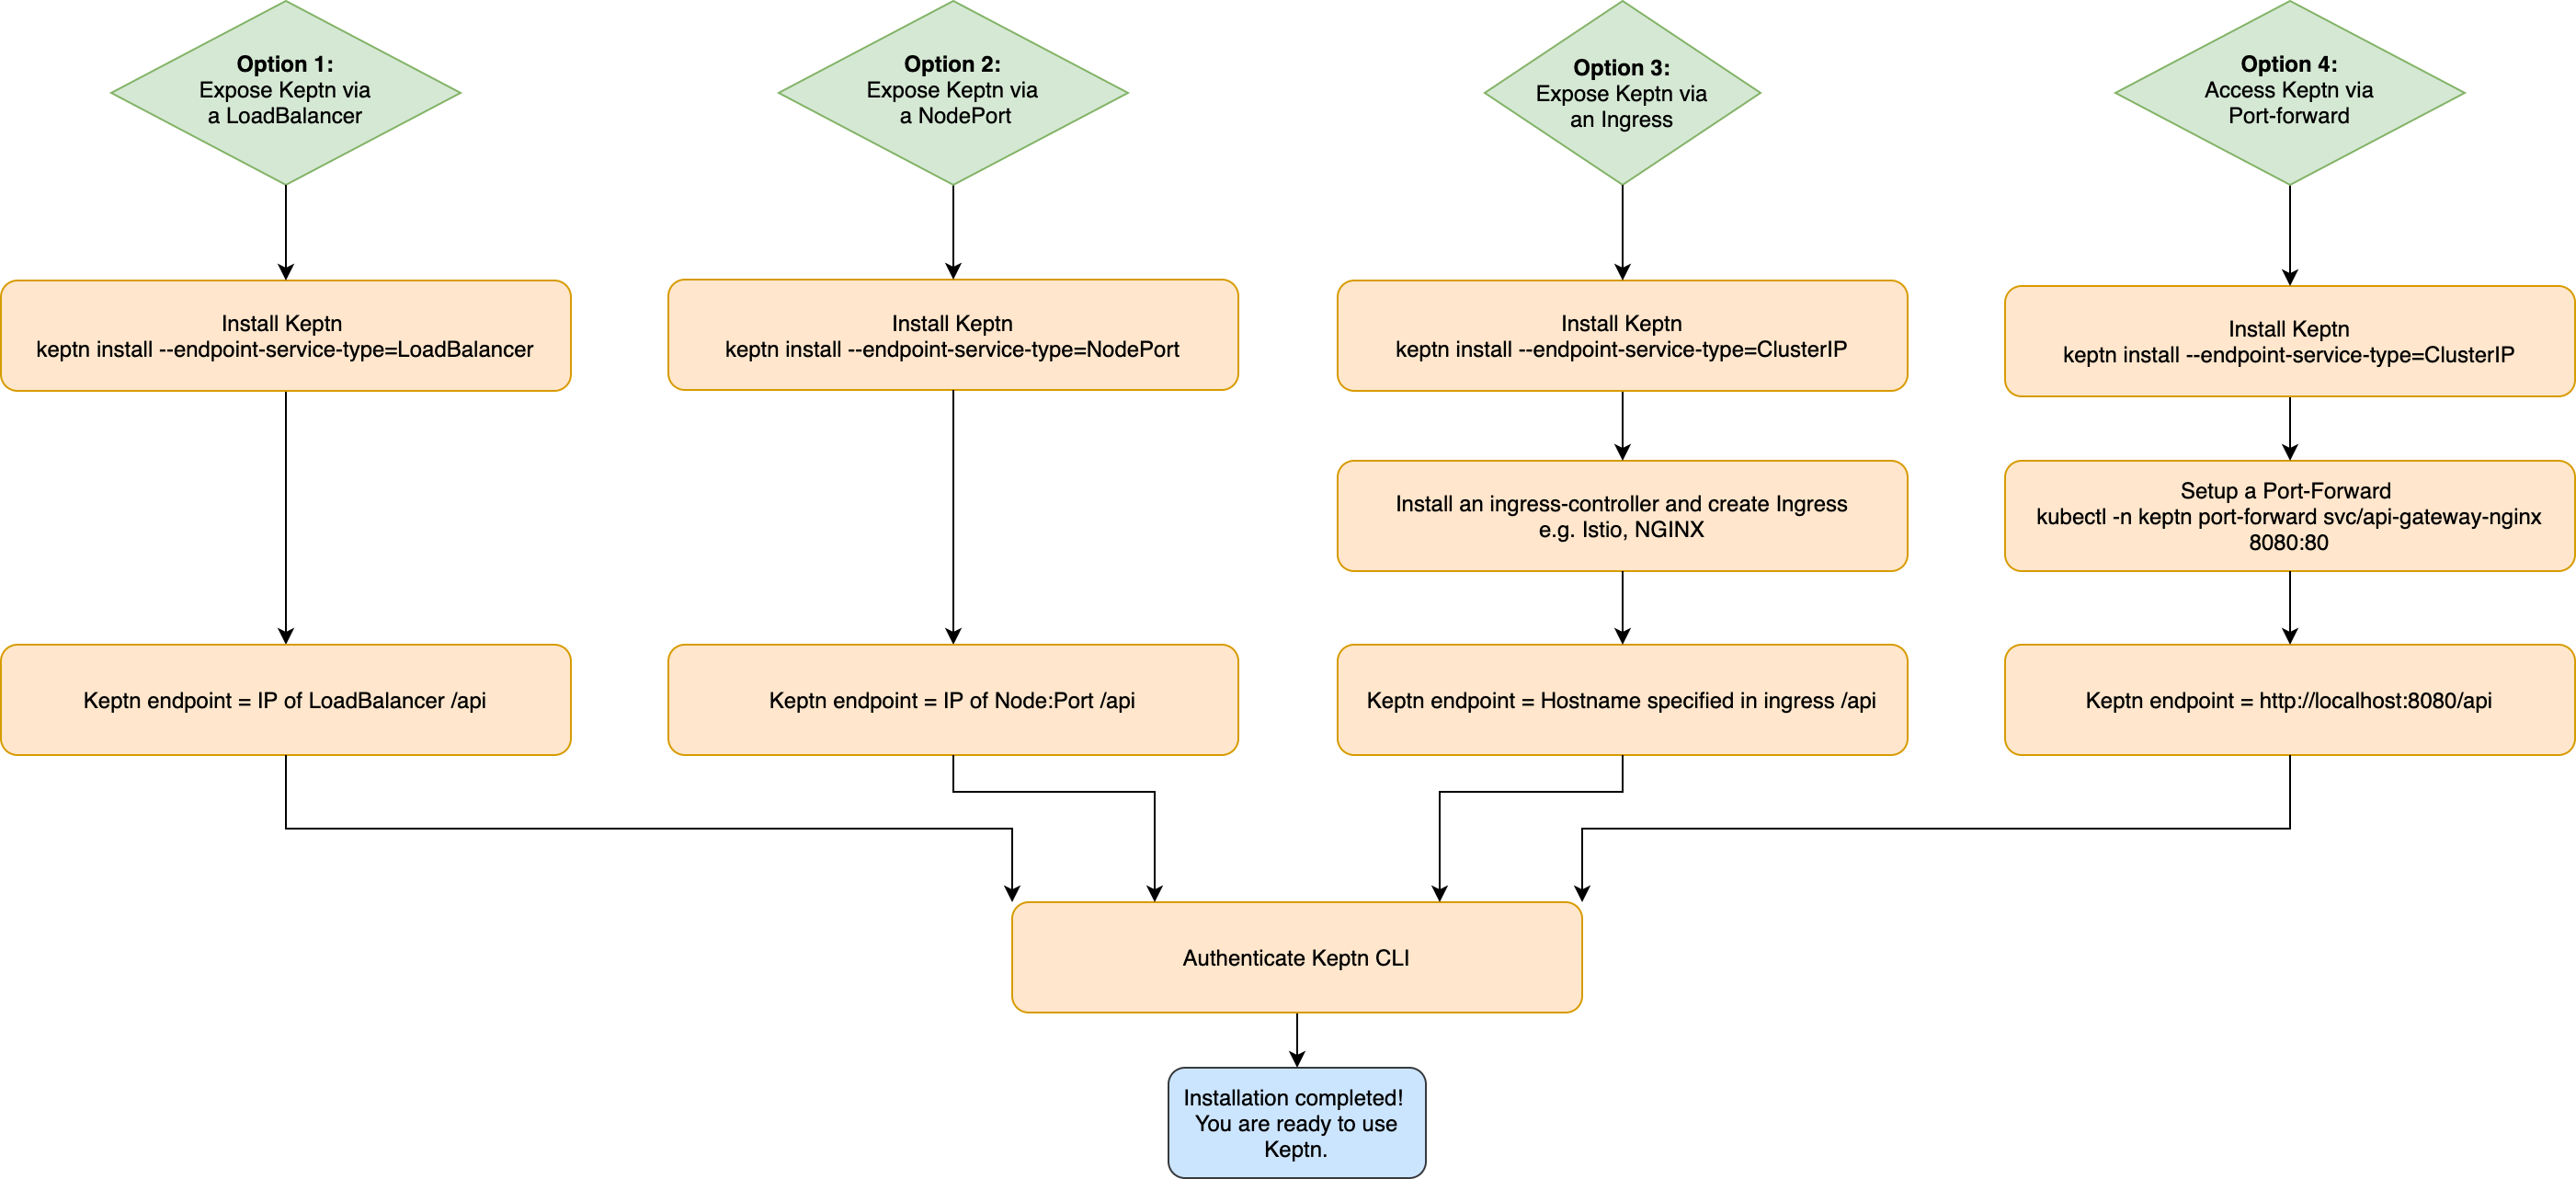
How to access Keptn?
Before installing Keptn on your cluster, please also consider how you would like to access Keptn. Kubernetes provides the following four options:
- Option 1: Expose Keptn via an LoadBalancer
- Option 2: Expose Keptn via a NodePort
- Option 3: Expose Keptn via a Ingress
- Option 4: Access Keptn via a Port-forward
An overview of the four options is provided in the graphic below and the respective steps of all options are described below.
Option 1: Expose Keptn via a LoadBalancer
This option exposes Keptn externally using a cloud provider’s load balancer (if available).
- Install Keptn: For installing Keptn on your cluster, please use the Keptn CLI.
Depending on whether you would like to install the execution plane for continuous delivery, add the flag
--use-case=continuous-delivery. Furthermore, if you are on OpenShift, please add--platform=openshift.
keptn install --endpoint-service-type=LoadBalancer (--use-case=continuous-delivery) (--platform=openshift)
- Get Keptn endpoint: Get the EXTERNAL-IP of the
api-gateway-ngixusing the command below. The Keptn API endpoint is:http://<ENDPOINT_OF_API_GATEWAY>/api
kubectl -n keptn get service api-gateway-nginx
NAME                TYPE        CLUSTER-IP    EXTERNAL-IP                  PORT(S)   AGE
api-gateway-nginx   ClusterIP   10.117.0.20   <ENDPOINT_OF_API_GATEWAY>    80/TCP    44m
*Optional:* Store Keptn API endpoint in an environment variable.

For Linux and Mac:
```console
KEPTN_ENDPOINT=http://<ENDPOINT_OF_API_GATEWAY>/api
```

For Windows:
```console
$Env:KEPTN_ENDPOINT = 'http://<ENDPOINT_OF_API_GATEWAY>/api'
```
⚠️ Warning: If you do not set up TLS encryption, all your traffic to and from the Keptn endpoint is not encrypted.
Option 2: Expose Keptn via a NodePort
This option exposes Keptn on each Kubernetes Node’s IP at a static port. Therefore, please make sure that you can access the Kubernetes Nodes in your network.
- Install Keptn: For installing Keptn on your cluster, please use the Keptn CLI.
Depending on whether you would like to install the execution plane for continuous delivery, add the flag
--use-case=continuous-delivery. Furthermore, if you are on OpenShift, please add--platform=openshift.
keptn install --endpoint-service-type=NodePort (--use-case=continuous-delivery) (--platform=openshift)
-
Get Keptn endpoint: Get the mapped port of the
api-gateway-nginxusing the command below.API_PORT=$(kubectl get svc api-gateway-nginx -n keptn -o jsonpath='{.spec.ports[?(@.name=="http")].nodePort}')Next, get the internal or external IP address of any Kubernetes node:
EXTERNAL_NODE_IP=$(kubectl get nodes -o jsonpath='{ $.items[0].status.addresses[?(@.type=="ExternalIP")].address }')
INTERNAL_NODE_IP=$(kubectl get nodes -o jsonpath='{ $.items[0].status.addresses[?(@.type=="InternalIP")].address }')
The Keptn API endpoint (either via the internal or external IP; try both if unsure) is:
http://${INTERNAL_NODE_IP}:${API_PORT}/apiorhttp://${EXTERNAL_NODE_IP}:${API_PORT}/apiOptional: Store Keptn API endpoint in an environment variable.
For Linux and Mac:
KEPTN_ENDPOINT=http://${EXTERNAL_NODE_IP}:${API_PORT}/apiFor Windows:
$Env:KEPTN_ENDPOINT = 'http://${EXTERNAL_NODE_IP}:${API_PORT}/api'
⚠️ Warning: If you do not set up TLS encryption, all your traffic to and from the Keptn endpoint is not encrypted.
Option 3: Expose Keptn via an Ingress
- Install Keptn: For installing Keptn on your cluster, please use the Keptn CLI.
Depending on whether you would like to install the execution plane for continuous delivery, add the flag
--use-case=continuous-delivery. Furthermore, if you are on OpenShift, please add--platform=openshift.
keptn install (--use-case=continuous-delivery) (--platform=openshift)
-
Install an Ingress-Controller and create an Ingress: Please first install your favorite Ingress-Controller and then apply an Ingress object in the
keptnnamespace, which points to the serviceapi-gateway-nginxon port 80. Note that the Kubernetes Ingress allows to setup TLS encryption. Note: Using Openshift 3.11 requires to use a configuration for this platform.Commonly used Ingress-Controller are e.g. Istio and NGINX:
-
Istio provides an Ingress Controller. To install Istio, please refer to the official documentation.
-
kubectl -n istio-system get svc istio-ingressgateway
* Create an `ingress-manifest.yaml` manifest for an Ingress object in which you set IP-ADDRESS or your hostname and then apply the manifest. (**Note:** In the example below, `nip.io` is used as wildcard DNS for the IP address.)

```yaml
apiVersion: networking.k8s.io/v1
kind: Ingress
metadata:
annotations:
  kubernetes.io/ingress.class: istio
name: api-keptn-ingress
namespace: keptn
spec:
rules:
- host: <IP-ADDRESS>.nip.io
  http:
    paths:
    - path: /
      pathType: Prefix
      backend:
        service:
          name: api-gateway-nginx
          port:
            number: 80
kubectl apply -f ingress-manifest.yaml-
Istio provides an Ingress Controller. To install Istio, please refer to the official documentation.
-
kubectl -n istio-system get svc istio-ingressgateway
* Create an `ingress-manifest.yaml` manifest for an Ingress object in which you set IP-ADDRESS or your hostname and then apply the manifest. (**Note:** In the example below, `nip.io` is used as wildcard DNS for the IP address.)

```yaml
apiVersion: networking.k8s.io/v1beta1
kind: Ingress
metadata:
annotations:
  kubernetes.io/ingress.class: istio
name: api-keptn-ingress
namespace: keptn
spec:
rules:
- host: <IP-ADDRESS>.nip.io
  http:
    paths:
    - backend:
        serviceName: api-gateway-nginx
        servicePort: 80
kubectl apply -f ingress-manifest.yaml-
To install an NGINX Ingress Controller, please refer to the official documentation.
-
kubectl -n ingress-nginx get svc ingress-nginx
* Create an `ingress-manifest.yaml` manifest for an ingress object in which you set IP-ADDRESS or your hostname and then apply the manifest. (**Note:** In the example below, `nip.io` is used as wildcard DNS for the IP address.)

```yaml
apiVersion: networking.k8s.io/v1
kind: Ingress
metadata:
annotations:
  kubernetes.io/ingress.class: nginx
name: api-keptn-ingress
namespace: keptn
spec:
rules:
- host: <IP-ADDRESS>.nip.io
  http:
    paths:
    - path: /
      pathType: Prefix
      backend:
        service:
          name: api-gateway-nginx
          port:
            number: 80
kubectl apply -f ingress-manifest.yaml-
To install an NGINX Ingress Controller, please refer to the official documentation.
-
kubectl -n ingress-nginx get svc ingress-nginx
* Create an `ingress-manifest.yaml` manifest for an ingress object in which you set IP-ADDRESS or your hostname and then apply the manifest. (**Note:** In the example below, `nip.io` is used as wildcard DNS for the IP address.)

```yaml
apiVersion: networking.k8s.io/v1beta1
kind: Ingress
metadata:
annotations:
  kubernetes.io/ingress.class: nginx
name: api-keptn-ingress
namespace: keptn
spec:
rules:
- host: <IP-ADDRESS>.nip.io
  http:
    paths:
    - backend:
        serviceName: api-gateway-nginx
        servicePort: 80
kubectl apply -f ingress-manifest.yaml -
-
Get Keptn endpoint: Get the HOST of the
api-keptn-ingressusing the command below. The Keptn API endpoint is:http://<HOST>/api
kubectl -n keptn get ingress api-keptn-ingress ```
```console
NAME HOSTS ADDRESS PORTS AGE api-keptn-ingress x.x.x.x 80 48m ```
*Optional:* Store Keptn API endpoint in an environment variable.

For Linux and Mac:
```console
KEPTN_ENDPOINT=http://<HOST>/api
```

For Windows:
```console
$Env:KEPTN_ENDPOINT = 'http://<HOST>/api'
```
⚠️ Warning: If you do not set up TLS encryption, all your traffic to and from the Keptn endpoint is not encrypted.
Option 4: Access Keptn via a Port-forward
This option does not expose Keptn to the public but exposes Keptn on a cluster-internal IP.
- Install Keptn: For installing Keptn on your cluster, please use the Keptn CLI.
Depending on whether you would like to install the execution plane for continuous delivery, add the flag
--use-case=continuous-delivery. Furthermore, if you are on OpenShift, please add--platform=openshift.
keptn install (--use-case=continuous-delivery) (--platform=openshift)
- Setup a Port-Forward: Configure the port-forward by using the command below.
kubectl -n keptn port-forward service/api-gateway-nginx 8080:80
```console
kubectl -n keptn port-forward service/api-gateway-nginx 8080:80 --address 0.0.0.0
```
-
Get Keptn endpoint: The Keptn API endpoint is:
http://localhost:8080/apiOptional: Store Keptn API endpoint in an environment variable:
KEPTN_ENDPOINT=http://localhost:8080/api
Authenticate Keptn CLI
To authenticate the Keptn CLI against the Keptn cluster, the exposed Keptn endpoint and API token are required. After installing Keptn, you already have your Keptn endpoint.
- Set the environment variable
KEPTN_API_TOKEN:
KEPTN_API_TOKEN=$(kubectl get secret keptn-api-token -n keptn -ojsonpath={.data.keptn-api-token} | base64 --decode)
- To authenticate the CLI against the Keptn cluster, use the keptn auth command:
keptn auth --endpoint=$KEPTN_ENDPOINT --api-token=$KEPTN_API_TOKEN
Note: If you receive a warning Using a file-based storage for the key because the password-store seems to be not set up. this is because a password store could not be found in your environment. In this case, the credentials are stored in ~/.keptn/.password-store in your home directory.
Please expand the corresponding section matching your CLI tool:
For the Windows PowerShell, a small script is provided that installs the PSYaml module and sets the environment variables.
- Set the environment variable
KEPTN_ENDPOINT:
$Env:KEPTN_ENDPOINT = 'http://<ENDPOINT_OF_API_GATEWAY>/api'
- Copy the following snippet and paste it in the PowerShell. The snippet retrieves the API token and sets the environment variable
KEPTN_API_TOKEN:
$tokenEncoded = $(kubectl get secret keptn-api-token -n keptn -ojsonpath='{.data.keptn-api-token}')
$Env:KEPTN_API_TOKEN = [System.Text.Encoding]::UTF8.GetString([System.Convert]::FromBase64String($tokenEncoded))
- To authenticate the CLI against the Keptn cluster, use the keptn auth command:
keptn auth --endpoint=$Env:KEPTN_ENDPOINT --api-token=$Env:KEPTN_API_TOKEN
In the Windows Command Line, a couple of steps are necessary.
- Set the environment variable
KEPTN_ENDPOINT:
set KEPTN_ENDPOINT=http://<ENDPOINT_OF_API_GATEWAY>/api
- Get the Keptn API Token encoded in base64:
kubectl get secret keptn-api-token -n keptn -ojsonpath={.data.keptn-api-token}
abcdefghijkladfaea
-
Take the encoded API token - it is the value from the key
keptn-api-token(in this example, it isabcdefghijkladfaea) and save it in a text file, e.g.,keptn-api-token-base64.txt -
Decode the file:
certutil -decode keptn-api-token-base64.txt keptn-api-token.txt
- Open the newly created file
keptn-api-token.txt, copy the value and paste it into the next command:
set KEPTN_API_TOKEN=keptn-api-token
- To authenticate the CLI against the Keptn cluster, use the keptn auth command:
keptn.exe auth --endpoint=$Env:KEPTN_ENDPOINT --api-token=$Env:KEPTN_API_TOKEN
Authenticate Keptn Bridge
After installing and exposing Keptn, you can access the Keptn Bridge by using a browser and navigating to the Keptn endpoint without the api path at the end of the URL.
You can also use the Keptn CLI to retrieve the Bridge URL using:
keptn status
The Keptn Bridge has basic authentication enabled by default and the default user is keptn with an automatically generated password.
- To get the username for authentication, execute:
kubectl get secret -n keptn bridge-credentials -o jsonpath="{.data.BASIC_AUTH_USERNAME}" | base64 --decode
- To get the password for authentication, execute:
kubectl get secret -n keptn bridge-credentials -o jsonpath="{.data.BASIC_AUTH_PASSWORD}" | base64 --decode
- If you want to change the user and password for the authentication, follow the instructions here.
Change how to expose Keptn
If you would like to change the way of exposing Keptn, you can do this by re-installing Keptn and selecting the desired configuration. When the CLI asks you if you would like to overwrite the installation, confirm this with yes. This will keep all your data including the Git repos and events.
Advanced: Install Keptn using the Helm chart
Please see our guide at Advanced Installation Options for more information.
Troubleshooting
-
Generate a support-archive and ask for help in our Slack channel.
-
Uninstall Keptn by executing the keptn uninstall command before conducting a re-installation.